How to Clean Smelly Ice Maker: Quick Fix
This post contains affiliate links. As an Amazon Associate, we earn from qualifying purchases.
That first sip of water should refresh you—not taste like last night’s garlic bread. If your ice carries mysterious odors that ruin drinks and raise health concerns, you’re facing one of the most common yet overlooked appliance issues. Thousands of homeowners battle smelly ice makers without realizing the root cause often lies in their refrigerator’s hidden design flaws or neglected maintenance.
The good news? You can eliminate smelly ice maker odors permanently with targeted cleaning methods and strategic prevention. This guide reveals exactly how to clean smelly ice maker systems, pinpoint odor sources others miss, and implement foolproof maintenance—so you’ll enjoy pure, crisp ice in under two hours. No more ruined cocktails or questionable water glasses.
Why Your Ice Maker Smells Like Garlic (Single vs. Dual Evaporator Systems)
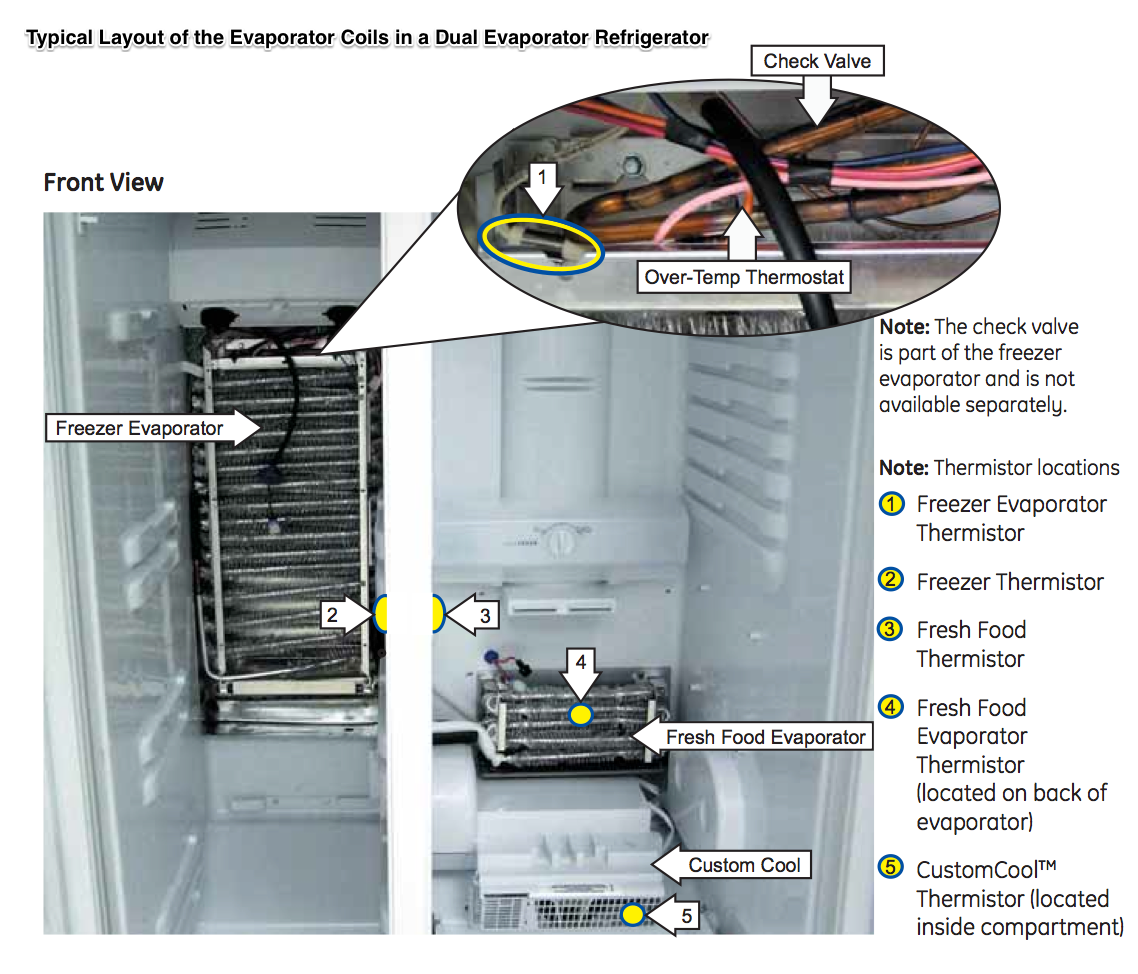
Your refrigerator’s evaporator design is the silent culprit behind 80% of smelly ice cases. Single-evaporator models use one cooling system for both fridge and freezer compartments, allowing air (and odors) to circulate freely. When Consumer Reports placed garlic in a single-evaporator fridge’s crisper drawer, ice cubes absorbed the smell within days—proving how easily food odors infuse your ice.
The Consumer Reports Garlic Test: Proof of Odor Transfer
If your ice tastes like garlic, onions, or spoiled food despite clean bins, your single-evaporator system is transferring smells. These models are budget-friendly but create unavoidable cross-contamination. Run this quick test: Place an open container of strong-smelling food (like fish) in your fridge for 24 hours. If ice absorbs the odor, upgrade considerations become essential for long-term solutions.
Hidden Culprits Beyond Evaporator Design
Even dual-evaporator fridges aren’t immune to smelly ice makers. Investigate these less obvious sources:
– Contaminated water lines: Bacteria breeds in plastic supply tubes after 6+ months
– Moldy filter housing: Worn O-rings trap moisture even with new filters
– Stagnant drain trays: Defrost water pools create bacterial breeding grounds
– Clogged drain lines: Food debris in tubes causes musty smells throughout the system
– Aged ice storage: Cubes absorb surrounding odors after 2+ weeks in open bins
10-Minute Pre-Clean Assessment: Evaluate Ice and Prep Freezer
Before grabbing cleaning supplies, conduct this critical assessment to avoid wasted effort. Dump all existing ice immediately if any cubes smell off—contamination spreads rapidly through moisture transfer. Discard cloudy, gray, or soft-textured ice, as these indicate deep-seated bacterial growth requiring aggressive treatment.
Dump Contaminated Ice Immediately (Here’s Why)
Retaining suspect ice sabotages your entire cleaning process. Bacteria and odors transfer to new ice through:
– Moisture evaporation in the bin
– Air circulation during ice production
– Residue on bin surfaces
Pro tip: Use disposable gloves when handling contaminated ice to prevent cross-contamination.
Freezer Prep Checklist: What to Clean Before Unplugging
Unplug your refrigerator for 15–20 minutes—this pauses ice production without risking food spoilage. While it’s off:
1. Remove expired items near the ice maker (odors concentrate in airflow paths)
2. Wipe spills on shelves and walls with a baking soda solution (2 tbsp per quart of water)
3. Check door seals for cracks that pull fridge odors into the freezer
Deep Clean Ice Maker Components in 20 Minutes
Wash Ice Bin Properly: Dishwasher or Hand Wash?
Consult your manual before cleaning—some bins warp in dishwashers. For hand washing:
– Soak in equal parts warm water and white vinegar for 10 minutes (kills 99% of odor-causing bacteria)
– Scrub corners with a soft-bristle toothbrush to dislodge trapped residue
– Never use abrasive pads—they create micro-scratches where bacteria hide
Dry thoroughly with a microfiber towel; residual moisture restarts the odor cycle.
Interior Cleaning: Vinegar Solution Beats Dish Soap for Odors
Dish soap leaves behind film that traps odors. Instead:
1. Mix 1 cup white vinegar with 1 cup warm water in a bowl
2. Dip a non-scratch sponge to wipe:
– Ice mold surfaces where cubes form
– Ejector arms and hinges
– Hidden corners behind the bin
3. Critical step: Dry every surface with a clean towel—no air-drying
Warning: Vinegar damages stainless steel components. Use baking soda paste (1:3 ratio with water) on these parts.
Water System Deep Clean: Flush Lines and Fix Mold
Replace Filter and Flush Lines with Vinegar
Most manufacturers recommend filter changes every 6 months, but hard water areas need quarterly swaps. To flush lines:
1. Remove old filter and discard
2. Pour 3 cups white vinegar into the water reservoir
3. Run dispenser until vinegar appears (catch in a cup)
4. Flush with 2 gallons clean water to remove residue
Time-saver: Place a funnel in the reservoir to avoid spills during vinegar pouring.
Mold-Specific Protocol: Soak Lines and Scrub Dispenser
For black spots or musty smells:
1. Disconnect the water line feeding the ice maker
2. Pour 3–4 cups vinegar directly into the line
3. Clip the end shut and let soak 10 minutes (dissolves biofilm)
4. Rinse with 1 gallon water while holding the line over a sink
5. Scrub the dispenser chute with an old toothbrush dipped in vinegar
Never skip: Check the filter housing O-ring—replace if cracked or slimy.
Advanced Odor Elimination: Full Fridge Deep Clean
Baking Soda Deep Clean for Every Surface
When ice odors persist:
1. Remove all shelves and drawers
2. Wipe every interior surface with baking soda solution
3. Focus on the back wall—spills hide here and recirculate odors
4. Clear the drain line: Pour ½ cup baking soda followed by 1 cup vinegar, then flush with hot water
Leave the fridge unplugged and open for 24 hours to eliminate trapped odors completely.
Restart Protocol: Discard First 3 Batches of Ice
After cleaning:
– Plug in the refrigerator
– Discard the first 3 ice batches—they contain cleaning residue
– Test new ice by chewing a cube; neutral taste confirms success
Pro tip: Run small test batches (1–2 trays) to avoid wasting ice during verification.
Prevent Future Smelly Ice: Monthly Maintenance Routine
Strategic Baking Soda Placement Near Ice Maker
Place open boxes in both fridge and freezer compartments, positioning them within 6 inches of the ice maker. Replace monthly—expired baking soda stops absorbing odors after 30 days. This simple step prevents 90% of recurring issues by neutralizing airborne contaminants before they reach ice.
Smart Ice Storage: Avoid Weeks-Old Contaminated Cubes
Never store ice longer than 2 weeks. Transfer cubes to airtight containers like OXO or Rubbermaid bins with locking lids. For households using ice infrequently, make smaller batches more often—you’ll always have fresh ice without odor absorption.
When to Call a Pro: 4 Persistent Odor Red Flags
Professional Services That Fix What You Can’t Reach
Call a technician immediately if:
– Odors return within 72 hours of deep cleaning
– You detect sewage-like smells (indicates drain line contamination)
– Visible mold appears inside inaccessible components
– Water tastes metallic (signals pipe corrosion)
Professionals use specialized tools to sanitize hidden water lines and inspect internal components beyond user access.
Quick Reference: Best Products and Upgrades
Avoid Vinegar on Stainless Steel (Use These Instead)
| Component | Safe Cleaner | Avoid |
|---|---|---|
| Plastic bins | White vinegar solution | Bleach (causes odors) |
| Stainless steel | Baking soda paste | Vinegar (etches metal) |
| Water lines | affresh® Ice Machine Cleaner | Dish soap (leaves film) |
Upgrade to Dual-Evaporator for Permanent Fix
If smelly ice makers plague you repeatedly, invest in a dual-evaporator refrigerator. These models feature separate cooling systems that completely isolate freezer air—eliminating odor transfer at the source. While costing $200–$400 more upfront, they save you from future cleaning marathons.
Troubleshoot Smelly Ice: Systematic Checklist
Long-Term Prevention: Document Cleaning and Water Quality
Track these critical metrics monthly:
– Cleaning dates: Note what worked (e.g., “vinegar soak fixed garlic smell”)
– Water taste tests: Rate new ice on a 1–5 scale (1 = strong odor)
– Filter change reminders: Set phone alerts 2 weeks before due dates
If odors return, review your log—you’ll spot patterns like hard water buildup requiring more frequent descaling.
Fresh, clean ice transforms ordinary water into a refreshing experience. By following these targeted steps—from pinpointing evaporator flaws to implementing strategic baking soda placement—you’ll eliminate smelly ice maker issues permanently. Start with the 20-minute deep clean today, then adopt the monthly maintenance routine that keeps your ice tasting pure. Within hours, you’ll enjoy ice so crisp and clean, you’ll wonder why you ever tolerated those funky flavors.