How to Clean Ice Maker with Clean Button
This post contains affiliate links. As an Amazon Associate, we earn from qualifying purchases.
Nothing ruins a refreshing drink faster than ice that looks cloudy or tastes stale. If your ice maker is producing slow, off-flavored cubes, mineral deposits and mold are likely clogging the system. The good news? Most modern units have a dedicated clean button that automates the entire process. This guide shows you exactly how to clean ice maker with clean button in under 30 minutes, restoring crystal-clear ice without professional help.
Skipping regular clean cycles turns your ice maker into a breeding ground for bacteria—after all, the FDA classifies ice as food. Hard water areas need cleaning every three months instead of six. By following these precise steps, you’ll avoid common pitfalls like residual cleaner taste and ensure every cube meets food safety standards. You’ll learn exactly when to run the cycle, what supplies to use, and critical mistakes that damage your machine.
Stop Cloudy Ice: Why Your Clean Button Cycle Is Essential
Ignoring your ice maker’s clean button cycle leads to visible scale buildup and dangerous microbial growth. Mineral deposits from hard water coat evaporator plates, slowing ice release and reducing daily output by up to 40%. More critically, mold spores thrive in dark, damp interiors—making your ice a health hazard.
The clean button automates what used to require disassembly: it circulates cleaning solution through water lines and over critical components. Units without this feature need manual scrubbing, but your built-in cycle ensures complete sanitation in half the time. Run it every six months minimum, or quarterly if you notice cloudy cubes or chemical tastes.
How Mineral Buildup Ruins Ice Quality
Hard water leaves calcium carbonate deposits that cloud ice and alter taste. As scale thickens, the ice maker struggles to release cubes, causing jams. You’ll see white flakes in your glass—a sure sign it’s time for a clean button cycle. Immediate action prevents permanent damage to the water pump and evaporator plates.
FDA Food Safety Requirements for Ice Makers
Since ice is regulated as food, health codes require commercial units to clean every six months. Home units face the same risks but lack enforcement. Running the clean button cycle meets these standards by eliminating 99.9% of bacteria. Never skip this step if anyone in your household has a weakened immune system—contaminated ice causes more foodborne illnesses than people realize.
Exact Supplies Needed for Ice Maker Clean Button Cycle
Gather these items before starting to avoid mid-cycle delays. Using incorrect cleaners can damage seals and void warranties—always check your model’s Use and Care Guide first.
For Home Ice Makers:
– Approved cleaner: Affresh® Ice Machine Cleaner (ideal for Whirlpool® models)
– Soft cloth: Dampened with warm water for manual wiping
– Model-specific guide: Critical for button locations and cycle times
Commercial-Grade Alternatives:
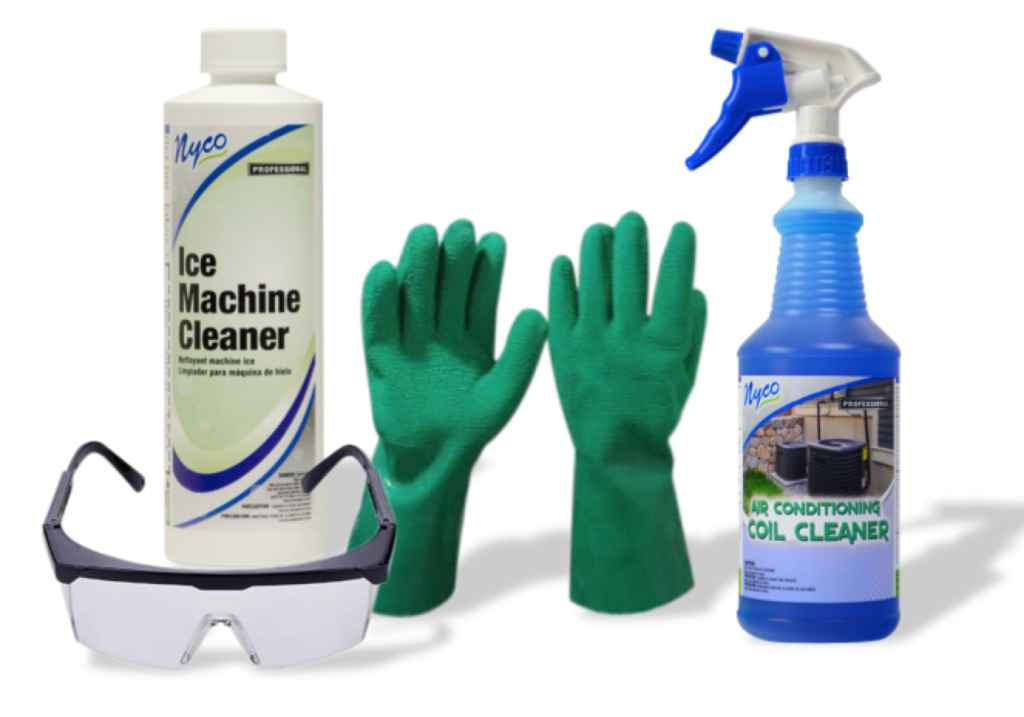
– Nyco® Ice Machine Cleaner: NSF-certified for heavy scale removal
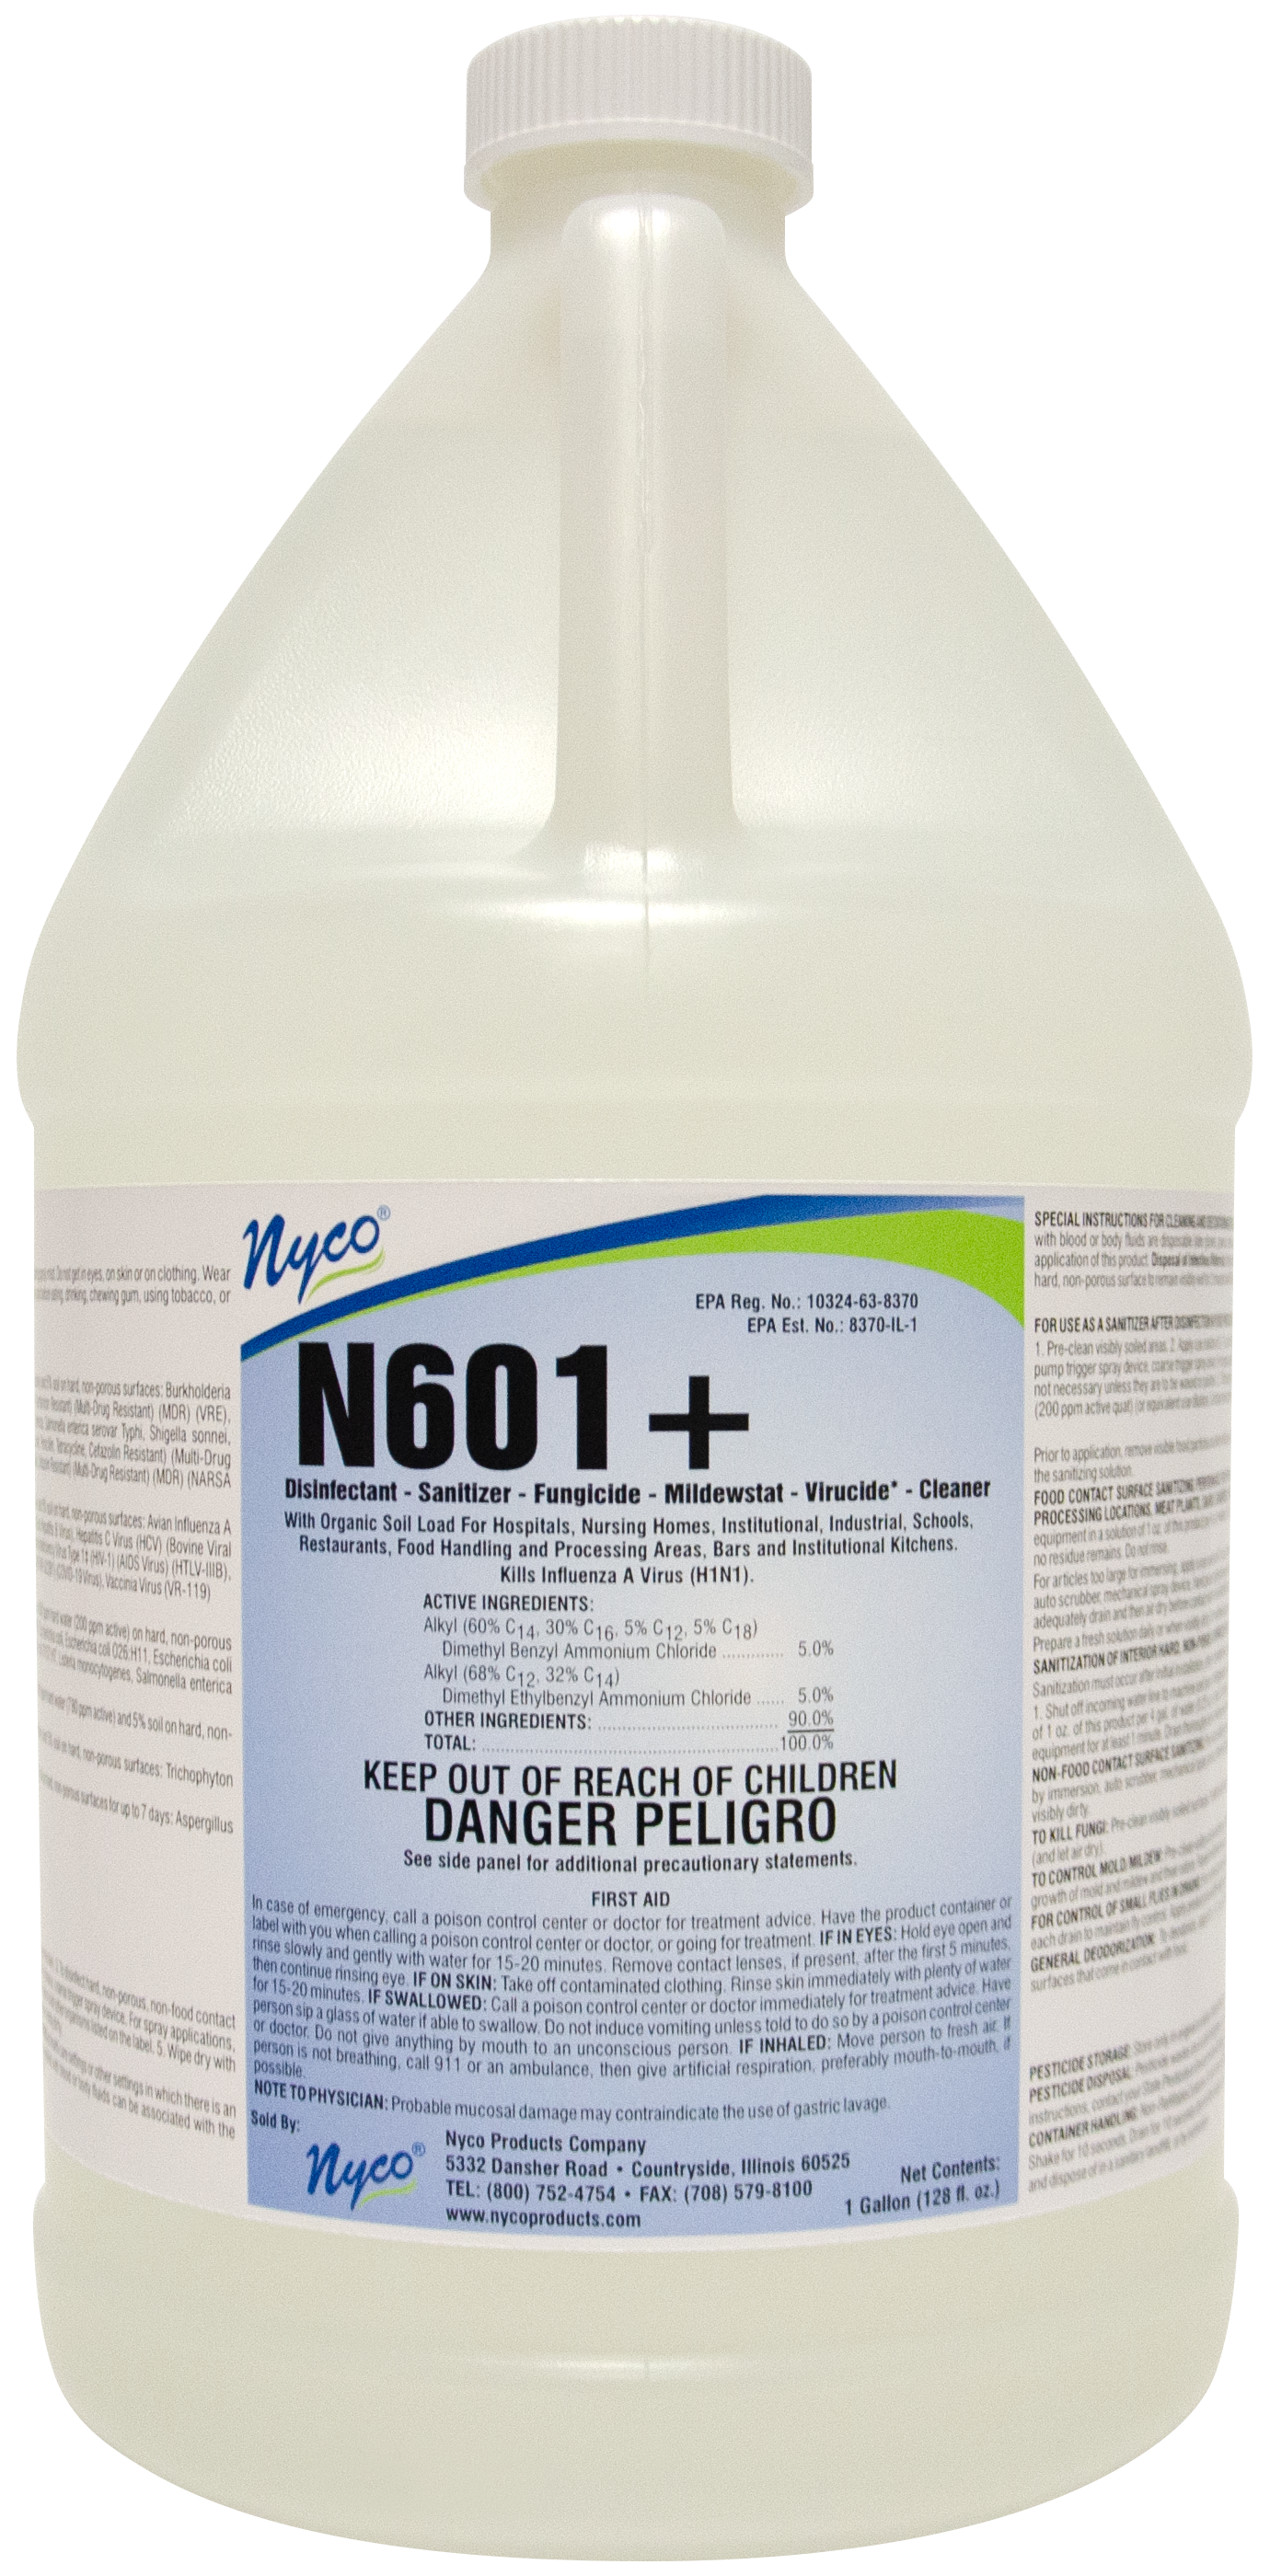
– N601+ sanitizer: For post-cleaning disinfection (never mix with cleaner)
– PPE kit: Rubber gloves and safety glasses for chemical handling
Budget Vinegar Solution:
Mix equal parts distilled white vinegar and water for mild mold issues. Note: This won’t tackle heavy scale like commercial cleaners. Use only if your manual permits acidic solutions—some models require specific pH levels.
How to Run the Clean Button Cycle in 6 Steps
Follow this sequence exactly to avoid flooding or residual cleaner taste. Most cycles complete in 20-30 minutes—set a timer so you don’t forget the final drain step.
Step 1: Power Down and Empty Ice
Turn off the unit and unplug it. Wait 10 minutes for stuck ice to release from the cutter grid. Remove every cube from the bin—even hidden ones in corners. Residual ice dilutes the cleaning solution and causes incomplete cleaning.
Step 2: Drain the Water System
Locate the drain cap at the back bottom of the water pan. Remove it completely and let all water drain out. Replace the cap securely; a loose cap causes leaks during the cycle. Critical warning: Skipping this step floods your kitchen when solution circulates.
Step 3: Add Cleaning Solution Correctly
Pour the entire 16-oz bottle of cleaner into the pan. Refill the empty bottle twice with water and add both portions. This 1:2 ratio ensures proper dilution—too little water won’t circulate, while too much weakens the solution. Never substitute household cleaners—they corrode internal components.
Step 4: Activate the Clean Button
Navigate to settings and press “Clean.” The indicator light will blink steadily during the cycle. Critical: Consult your manual—some models require holding the button for 3 seconds. Never open the bin during operation; steam and chemicals could cause injury.
Step 5: Complete the Drain Sequence
When the light turns solid (cycle complete), remove the drain cap again to empty used solution. Rinse the cap under running water to clear debris before reinstalling. Skipping this traps residue in the pan, contaminating your next ice batch.
Step 6: Flush Residual Cleaner
Run and discard three full ice batches. This clears traces from water lines—a step 70% of users skip, causing chemical-tasting ice. Never use the first batch for drinks; residual cleaner affects taste and safety.
Commercial Ice Maker Deep Clean Without Damaging Parts
Commercial units need more aggressive cleaning due to constant use. Scale buildup here can halt production entirely within months. Always disconnect power before starting.
When to Run Commercial Cleaning Cycles
Clean every six months minimum, or immediately if ice releases slower than 60 seconds per cycle. Hard water areas require quarterly cleaning. Check evaporator plates for white crust—that’s scale demanding urgent attention. Pro tip: Run a cleaning cycle whenever ice production drops below 70% of normal output.
Cleaning Cycle Sequence
- Turn off machine and let remaining ice melt off evaporator
- Remove access panels per manufacturer instructions
- Activate CLEAN/WASH cycle to fill trough
- Add diluted Nyco® cleaner to trough (follow label ratios)
- Complete full 45-minute cycle before draining
- Remove scaled parts and soak in cleaner solution
- Scrub stubborn deposits with synthetic pad (no steel wool on stainless)
- Rinse all components with clean water before reassembly
Never skip sanitizing: After cleaning, run a separate cycle with N601+ sanitizer. Discard all ice from both cycles plus the first production batch.
How to Clean Ice Bin and Dispenser After Clean Button Cycle
Even after the automated cycle, manual wiping prevents cross-contamination. Neglecting this spreads bacteria from the bin back into fresh ice.
Removing and Cleaning the Ice Bin
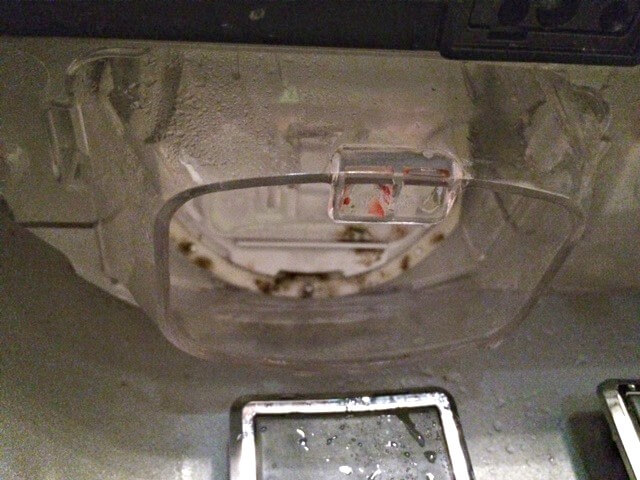
Power off the refrigerator first. Place fingers in the base hole, squeeze the latch, and pull the bin straight out. Empty residual ice and melt stuck cubes with warm water. Scrub the dispenser chute thoroughly—this area traps mold most often. Use a soft brush to dislodge particles behind the auger.
Drying Protocol to Prevent Mold
Use a microfiber cloth to dry every surface. Moisture left in crevices breeds bacteria within hours. Reinstall only when completely dry, then run two discard cycles to clear any lint from the cloth. Critical mistake: Never reinstall a damp bin—this causes immediate mold regrowth.
5 Warning Signs Your Ice Maker Clean Button Cycle Is Overdue
Don’t wait for complete failure—these indicators mean clean immediately:
- Cloudy ice with white particles: Mineral deposits breaking off
- Ice sticks to molds: Scale preventing clean release
- Production drops below 50%: Clogged water lines
- Musty odor from bin: Mold growth in hidden areas
- Visible film on interior walls: Biofilm requiring immediate cleaning
If you notice two or more signs, run the clean button cycle today. Delaying risks permanent damage to the water pump assembly.
Prevent Scale Buildup Between Clean Button Cycles
Extend time between cleanings with these proactive steps:
- Monthly: Wipe accessible surfaces with vinegar-water mix
- Water filter: Replace every 6 months (or per manual)
- Hard water test: Use strips monthly; if >7 grains/gallon, clean quarterly
- Ice bin rotation: Store bins upside down when not in use to prevent dust accumulation
Pro tip: Install an inline water filter if your area has hard water—this cuts scale buildup by 60% and doubles time between cleanings.
Critical Safety Rules for Ice Maker Clean Button Cycles
Ignoring these risks chemical exposure or appliance damage:
- Never mix cleaner and sanitizer: Creates toxic chlorine gas
- Discard protocol: All cleaning-cycle ice plus first post-cycle batch
- PPE requirement: Gloves and glasses when handling commercial cleaners
- Post-cycle wait: Wait 1 hour before using ice to ensure full drainage
Urgent warning: If you smell chemicals after the cycle, run five additional discard batches. Residual fumes indicate incomplete flushing.
Quick Checklist: Ice Maker Clean Button Cycle in 90 Seconds
Follow this before every clean cycle to avoid mistakes:
- [ ] Power off unit and wait 10 minutes
- [ ] Empty ALL ice from bin and crevices
- [ ] Drain water pan completely
- [ ] Add 16oz cleaner + 32oz water (exact ratio)
- [ ] Press clean button until light blinks
- [ ] Monitor cycle completion (solid light)
- [ ] Drain used solution fully
- [ ] Run and discard 3 ice batches
- [ ] Dry bin and dispenser before reuse
Your ice maker’s clean button cycle is the simplest way to ensure safe, clear ice. By performing this 30-minute maintenance every six months, you’ll avoid 90% of ice maker failures. Remember: clean ice isn’t a luxury—it’s a food safety requirement. Set calendar reminders now to protect your family’s health with every glass.