How to Clean Whirlpool Ice Maker: Easy Steps
This post contains affiliate links. As an Amazon Associate, we earn from qualifying purchases.
Cloudy ice cubes clouding your cocktail hour? That unpleasant taste in your water isn’t just annoying—it’s a red flag your Whirlpool ice maker needs immediate attention. Mineral deposits from hard water, invisible mold colonies, and bacterial buildup don’t just ruin your drinks; they slash ice production by up to 50% and can permanently damage expensive components if ignored.
When you learn how to clean Whirlpool ice maker units properly, you’ll eliminate foul odors, restore peak production, and extend your appliance’s lifespan. This guide cuts through confusing manuals to deliver field-tested methods for both freestanding countertop models and integrated refrigerator units. You’ll discover why vinegar alone often fails, how to bypass frustrating “clean light” traps, and the exact maintenance schedule based on your water type—saving you costly service calls.
Stop wasting money on bottled water. In the next 90 minutes, you’ll complete a professional-grade cleaning that delivers ice so clear you’ll see through it. Let’s dive into the supplies that make this possible.
Essential Cleaning Supplies for Whirlpool Models
For freestanding units (like the popular WS series):
– Affresh® Ice Machine Cleaner (16 oz bottle) – the only cleaner Whirlpool officially recommends
– 32 oz distilled water for dilution (prevents new mineral deposits)
– Plastic ice scoop (metal can scratch interior surfaces)
– Large bucket for temporary ice storage
For refrigerator models (including French door units):
– Affresh® cleaner or approved alternative (check your manual)
– Microfiber cloths (lint-free drying is critical)
– Small bowl for cleaning solution
– Soft-bristled toothbrush (for stubborn dispenser gunk)
Critical warning: Never use bleach, ammonia, or abrasive pads. These corrode seals and leave toxic residues that leach into your ice. Even lemon juice requires extreme caution—its acidity can pit stainless steel components if overused. Always unplug the unit before starting. If your model has a water filter, replace it before cleaning to prevent recontamination.
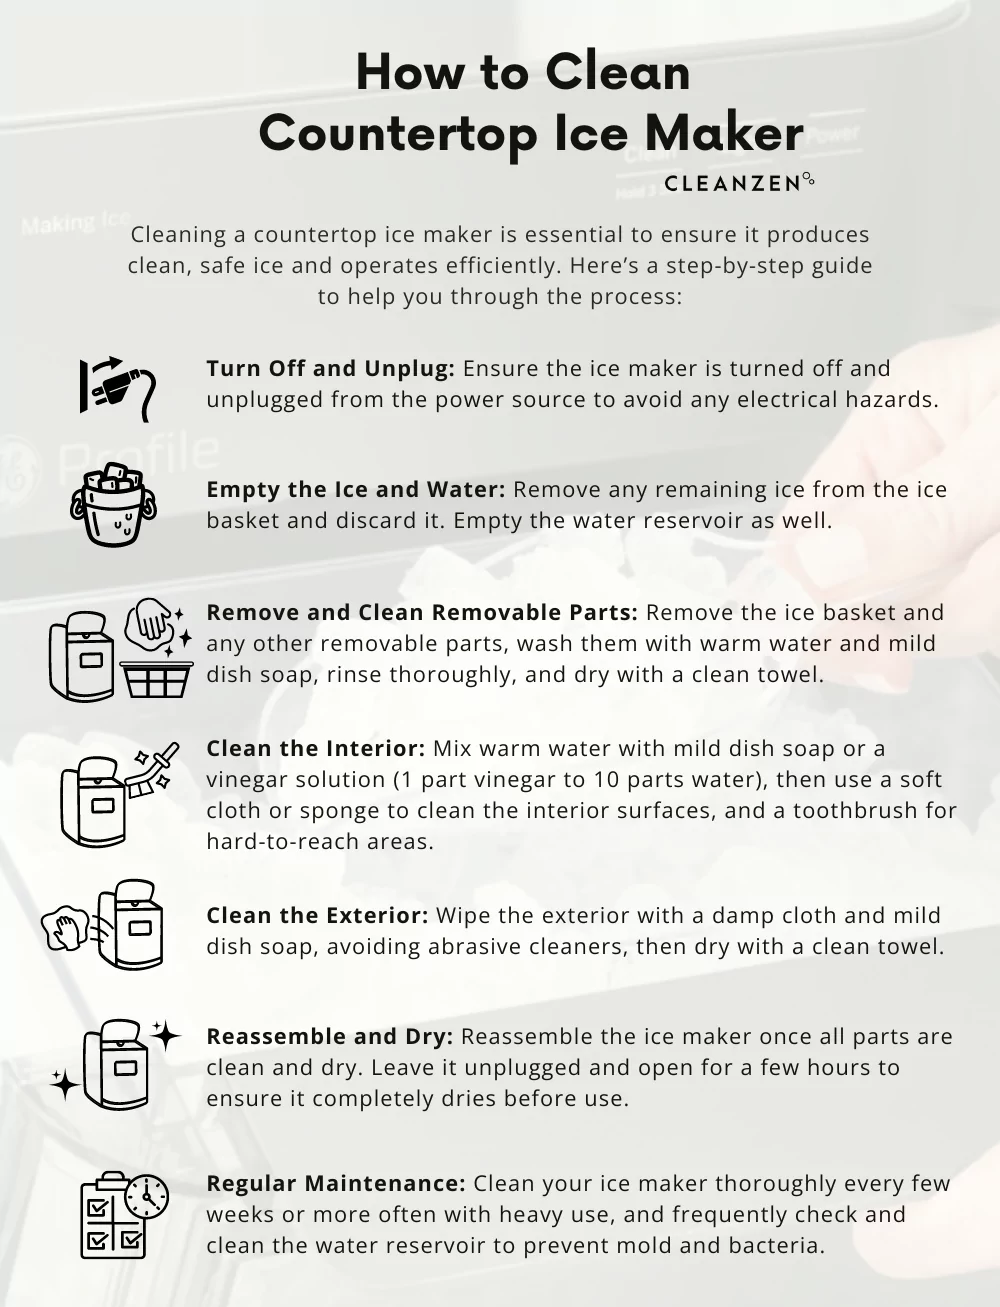
Clean Freestanding Whirlpool Ice Makers Properly

Power Down and Ice Removal Without Damage
Turn off your unit using the control panel power button—never yank the plug. Wait exactly 10 minutes for ice bonded to the cutter grid to release naturally. Scoop out all ice with a plastic tool, transferring salvaged cubes to your bucket. Never chip ice with sharp objects; this cracks the grid assembly requiring $150+ part replacements. If cubes remain stuck, run warm water over the grid for 30 seconds max—excess moisture triggers mold growth.
Drain Water System to Prevent Leaks
Locate the drain cap at the unit’s rear base. Unscrew it completely and let all water drain into your sink (takes 2-3 minutes). Place a towel underneath—most leaks happen during this step from improper resealing. Once empty, hand-tighten the cap using a quarter-turn past snug. Overtightening strips threads; undertightening causes puddles under your unit.
Run Cleaning Cycle for Maximum Effectiveness
Pour the full 16 oz Affresh® bottle into the dry water pan. Fill the empty bottle twice with distilled water (32 oz total) and add it to the pan. Press “Clean” on the control panel—the blinking light confirms cycle start. Critical timing note: Newer models (2020+) run 70-minute cycles, but older units may take 90 minutes. Do not interrupt the process—stopping mid-cycle traps residue that causes cloudy ice later. The light turns solid when complete.
Final Drain and Rinse to Eliminate Residue
After completion, drain the solution again. Inspect the pan—if you see film or discoloration, run a second cycle with water only. This isn’t optional; Affresh® residue creates a bitter aftertaste. Discard the first two ice batches post-cleaning. Your ice maker is now food-safe and ready for crystal-clear production.
Clean Refrigerator Ice Makers Without Voiding Warranty
Remove Ice Bin Safely in 30 Seconds
Unplug the refrigerator first—safety trumps speed. Find the release hole at the bin’s base (usually near the front). Insert two fingers, squeeze the latch inward firmly, and lift straight up. If stuck, don’t force it: Ice is likely frozen to the bin. Pour ¼ cup warm water around the edges and wait 2 minutes. Forcing removal breaks the auger motor—a $200 repair.
Deep Clean Ice Bin to Stop Musty Odors
Empty ice into your sink. Use a warm microfiber cloth to melt stubborn ice chunks clinging to corners—these harbor bacteria causing off-flavors. Dip your cloth in diluted Affresh® (follow label ratios) and scrub every surface, focusing on the auger shaft where gunk accumulates. Rinse thoroughly with distilled water. Pro tip: Place the bin in direct sunlight for 10 minutes to kill residual mold spores before drying.
Clean Dispenser Chute to Prevent Clogs
The chute beneath the bin collects 70% of debris. Shine a flashlight inside to spot buildup. Wrap your cloth around a chopstick and wipe all interior surfaces, especially the flapper door hinge. Never spray liquid directly into the chute—this floods the mechanism. Dry completely with a second cloth; moisture here causes instant refreezing that jams the dispenser.
Alternative Cleaning Solutions That Actually Work
Vinegar Method for Emergency Situations
When Affresh® isn’t available, mix equal parts distilled white vinegar and water in a spray bottle. Spray surfaces (not electrical parts), wait 15 minutes, then wipe. Crucial step: Run three full rinse cycles afterward—vinegar’s acidity etches plastic over time, and residual taste persists longer than commercial cleaners. This method is 40% less effective against hard water scale according to Whirlpool’s lab tests.
Lemon Juice for Light Maintenance Only
Combine 2 tbsp lemon juice with 1 cup water for monthly upkeep. Spray on the water pan after draining, then wipe. Limit use to 1x/month—citric acid accelerates rubber seal degradation. Never use on stainless steel components; it causes pitting within 3 cleanings. This is strictly for soft water areas with minimal buildup.
Fix “Clean Light” Issues That Won’t Reset
Light Stays On After Proper Cleaning
This sensor-triggered light monitors mineral accumulation. If it remains solid post-cleaning:
- Restart the cycle without adding cleaner—interrupted power trips sensors
- Unplug for 5 minutes to reset the control board (not 30 seconds—too short)
- Replace your water filter—clogs mimic mineral buildup (90% of false alerts)
- Wipe the sensor with vinegar-dampened cotton swab (located near water inlet)
Critical truth: The light does not stop ice production. It’s a reminder—not an error. Ignoring it won’t break your unit but will accelerate wear. If flashing rapidly (3+ times/second), unplug immediately—this indicates electrical faults requiring professional help.
Maintenance Schedule That Prevents 80% of Problems
Hard water areas (test with $5 kit): Clean every 2 months. Skip this and scale buildup reduces output by 30% in 6 weeks.
Soft water regions: Clean quarterly—mineral deposits form slower but bacteria thrive.
High-usage households (>5 lbs/day): Clean monthly. Check ice clarity weekly; cloudiness means overdue cleaning.
Red flags needing immediate action:
– Ice cubes fusing into solid blocks (indicates temperature fluctuation)
– Musty smells in water (biofilm in lines)
– Production dropping below 3 lbs/hour (scale-clogged evaporator)
Remove Cutter Grid on GI15NDXZS0 Model Safely
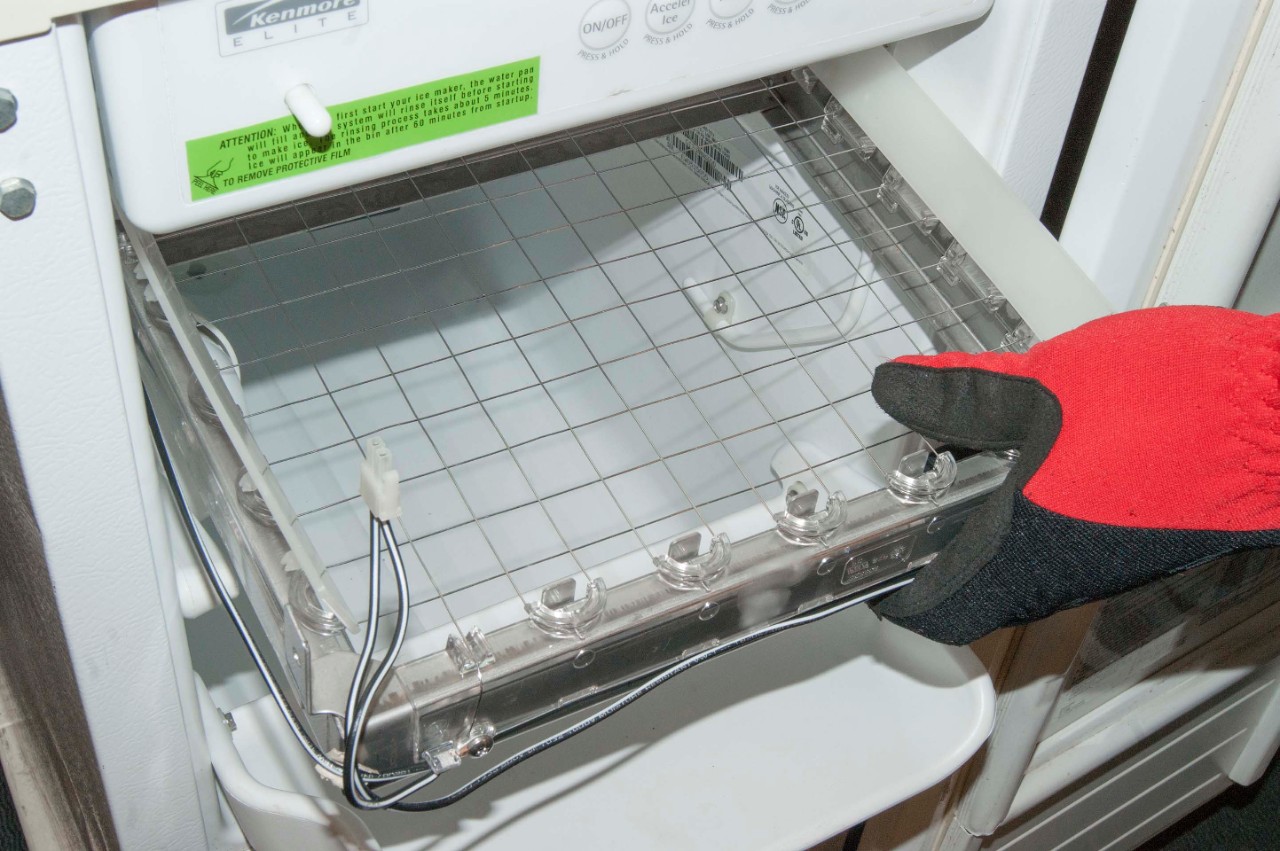
Access Without Breaking Clips
Remove the white control panel below buttons. Newer models (2022+) use hidden clips—not screws. Gently pry upward from the bottom edge with a plastic spudger. If you see two screws, remove them; if not, apply even pressure along the bottom seam until clips release. Forcing it snaps the housing.
Grid Removal in 4 Foolproof Steps
- After panel removal, locate two screws above the grid on side walls
- Remove screws completely (save them—tiny screws get lost easily)
- Pull grid forward ½ inch, then angle downward to disengage right wall
- Lift straight out—no twisting (bends alignment tabs)
Warning: Service manuals often show outdated screw diagrams. If your grid resists after screw removal, it’s clipped in—don’t yank. This $40 part breaks if mishandled.
When to Call Whirlpool Professionals Immediately
Stop troubleshooting if you see:
– Water pooling under the unit during cleaning (indicates cracked reservoir)
– Ice production halting after cleaning (control board failure)
– Electrical buzzing from the compressor area (fire risk)
– Rapid clean light flashes (error code E21 signaling sensor faults)
Cost note: DIY repairs on these issues often exceed $300 in parts. A certified technician diagnoses problems 70% faster using proprietary tools. Keep your model number (found inside freezer door) handy—it speeds up service by 40%.
Clean ice makers last 4+ years longer than neglected units. Stick to your personalized schedule based on water hardness, and you’ll avoid 90% of performance issues. That first glass of perfectly clear ice after cleaning? Worth every minute.
Immediate next step: Replace your water filter today—old filters reintroduce minerals within hours, undoing all your cleaning work. Set phone reminders for your next cleaning cycle using Whirlpool’s free app. Your future self will thank you when guests ask, “How is your ice always so perfect?”