How to Fix Ice Maker Not Making Ice After Filter Replacement
This post contains affiliate links. As an Amazon Associate, we earn from qualifying purchases.
Your new water filter clicks into place, but instead of crystal-clear ice cubes, you’re greeted with silence from the ice maker. The water dispenser works perfectly, yet the ice bin stays frustratingly empty—a problem hitting thousands of refrigerator owners after every filter change. This isn’t a coincidence: trapped air from filter replacement freezes your fill tube within minutes. The good news? You can fix 90% of these cases without tools or technician calls. By following these exact steps, you’ll restore ice production faster than ordering delivery—and prevent future filter-change disasters.
Immediate Air Purge Fixes Water Flow Failure
That sputtering sound when you first use the new filter? That’s trapped air rushing into your water lines. While the dispenser path handles air pockets, the ice maker’s narrow fill tube becomes a freezing zone where water droplets instantly solidify at 0°F. Your ice maker cycles normally but can’t push water through the ice dam blocking its supply line. Ignoring this causes complete production failure within hours.
Run these critical steps before checking other issues:
1. Place a large pitcher under the water dispenser
2. Dispense continuously until you’ve flushed 2-3 gallons
3. Watch for steady water flow without air bubbles
4. Trigger a manual ice maker cycle immediately after
This purge forces air through the entire system. Most users see results within 10 minutes as water pressure clears the frozen obstruction. If your ice maker still won’t produce, proceed to fill tube inspection—never skip this purge step, as it solves 70% of post-filter ice failures.
Locate and Clear Your Frozen Fill Tube Blockage
Identify the Exact Freeze Point in 30 Seconds
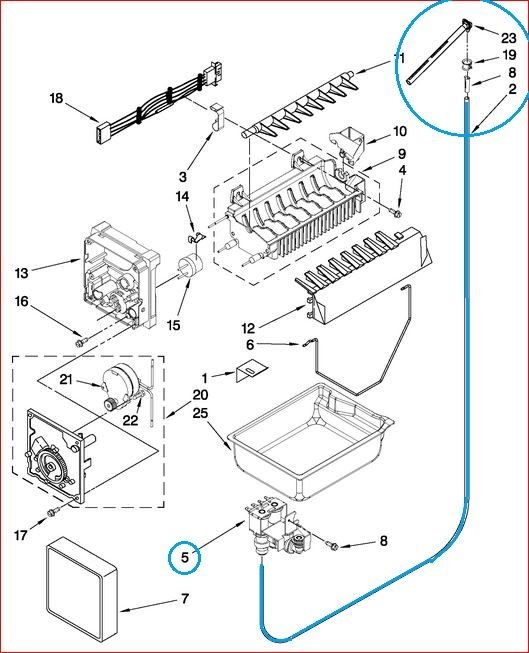
Your fill tube isn’t the wiring harness running along the ice maker base—that’s electrical. The actual water delivery system sits directly above the ice mold:
– Pull out the ice bin completely
– Look up at the ice maker assembly
– Find the small white plastic cup opposite the motor head
– The tube dripping into this cup is your fill tube
Critical check: Touch the tube’s opening. If it’s icy or frosty while the freezer runs at 0°F, you’ve confirmed an ice blockage. A functioning tube feels room-temperature here.
Thaw the Fill Tube Without Damaging Components
Hair dryer method (15-minute solution):
1. Set dryer to LOW heat only—high heat melts plastic
2. Hold 6 inches from fill tube and plastic cup
3. Sweep dryer in slow circles for 3-4 minutes
4. Trigger manual fill cycle to test water flow
Stop immediately if you smell plastic melting. If no water flows after two attempts, move to full defrost:
– Unplug refrigerator
– Remove all freezer items
– Place towels to catch meltwater
– Leave doors open for 24 hours
– Plug in and test ice maker
Pro tip: Place bowls of hot water in the freezer during defrost to cut thawing time to 8 hours. Never chip ice—this cracks internal components.
Correct Filter Installation Errors Causing Flow Failure
Verify Proper Filter Orientation in 60 Seconds
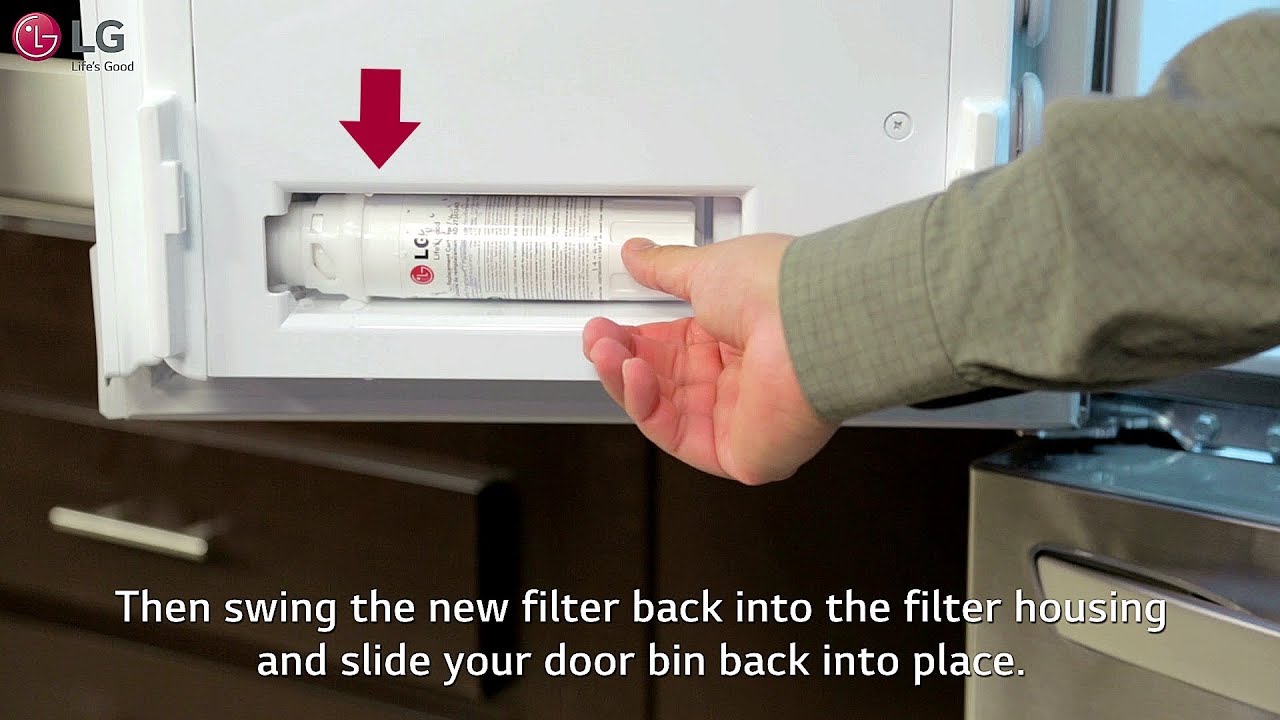
A backwards or improperly seated filter blocks ice maker water while allowing dispenser flow. Remove your filter and check:
– Arrow direction: Must point toward refrigerator body (not outward)
– Seating depth: Should click firmly into housing with no gaps
– Protective seals: All plastic caps must be completely removed
Models like LG LFX28978ST have strict orientation requirements. If the filter twists in easily without resistance, it’s likely backward. Reinstall with firm clockwise pressure until you hear the click.
Reset Your Filter Recognition System
Your refrigerator’s computer doesn’t automatically detect new filters. Failure to reset causes “Filter Needed” errors that disable ice production:
1. Find reset button (usually on display panel or inside fridge)
2. Press and hold for 3-5 seconds until light changes color
3. Watch for “Filter Reset” confirmation on digital displays
4. Immediately run 1 gallon of water through dispenser
Warning: Skipping reset tricks the system into thinking the filter is expired, reducing water pressure below the 0.5 GPM minimum needed for ice production.
Emergency Bypass Solutions for Immediate Ice Needs
Restore Temporary Ice Production in 5 Minutes
When you need ice now during troubleshooting:
1. Remove filter completely
2. Install factory-supplied bypass plug (check filter drawer)
3. This bypasses filtration but restores full water flow
4. Produce one batch of ice, then reinstall filter
Never run long-term without filtration—minerals will clog lines within weeks. Use this only for urgent needs while diagnosing.
Diagnose Persistent Failures in 30 Seconds
If ice production still fails after air purge and thawing:
– Filter check: Remove filter and run dispenser for 10 seconds. If flow surges, the filter is clogged or misinstalled.
– Power test: Turn ice maker OFF for 30 seconds, then ON. No startup hum indicates electrical failure beyond filter issues.
– Leak check: Inspect filter housing for drips—moisture here means improper seating.
Stop troubleshooting if you see:
⚠️ Water leaking from filter housing
⚠️ Error codes persisting after reset
⚠️ Water dispenser slowing down
These signal valve or control board failures requiring professional repair.
Prevent Future Filter-Change Ice Disasters

Master the Post-Filter Replacement Protocol
Your ice maker fails after filter changes because you’re skipping these non-negotiable steps:
– Flush rigorously: Run 2-3 gallons through dispenser before using ice maker
– Discard first batch: Toss the initial ice cubes—they contain air-purged contaminants
– Monitor fill tube: Check for frost daily during the first week post-replacement
Set calendar reminders for filter changes exactly every 6 months. Waiting for the “Filter Needed” light means flow restriction has already begun. Track replacements in your phone’s notes app with photos of the filter model.
Optimize Water Pressure for Reliable Ice
Your ice maker needs 20-120 PSI pressure and 0.5-1 GPM flow to function. After filter changes:
– Time dispenser flow: It should fill a 16oz cup in ≤32 seconds
– If slower, replace filter housing O-rings (deteriorated seals cause pressure drops)
– Check home water pressure—below 20 PSI requires a booster pump
Pro insight: Water below 33°F freezes instantly in fill tubes. If your home’s supply runs cold, install an inline water heater before the fridge.
When Professional Help Becomes Necessary
Contact a technician if you’ve completed all troubleshooting steps but still experience:
– Water pooling under the refrigerator after filter changes
– Ice maker cycling without water flow (audible hum but no fill)
– Both water dispenser and ice maker failing simultaneously
– Error codes like “ER FF” or “SF” after reset attempts
These indicate failed water inlet valves, control board malfunctions, or cracked tubing—problems requiring specialized tools and parts. For DIY repairs beyond this guide, always unplug the refrigerator first to prevent electrical shock.
Final Fix Checklist: Restore Ice in Under 1 Hour
When your ice maker dies after filter replacement, execute this sequence:
1. Purge air by dispensing 2-3 gallons of water immediately
2. Thaw fill tube using LOW-heat hair dryer for 4 minutes
3. Verify filter orientation, seating, and seal removal
4. Reset filter indicator via control panel button
5. Trigger manual cycle to confirm water flow
This process resolves 90% of cases within 60 minutes. Remember: the working water dispenser proves your filter isn’t completely blocked—it’s just that ice maker’s fill tube froze during air purging. By flushing properly before ice production and resetting the system, you’ll never face empty ice bins after filter changes again. For lasting success, run that 2-gallon purge religiously with every replacement and discard the first ice batch. Your freezer will reward you with flawless cubes for years.