GE Ice Maker Not Working? Fix It Fast
This post contains affiliate links. As an Amazon Associate, we earn from qualifying purchases.
Your GE refrigerator suddenly stops making ice mid-summer, leaving you with warm drinks and a growing grocery list. Before calling for expensive repairs, most ice maker failures can be solved with simple checks you can do in under 30 minutes. This guide walks through every proven fix—from basic resets to component replacements—using only the troubleshooting data GE technicians rely on. You’ll learn exactly why your GE ice maker stopped working and how to restore frozen refreshments without waiting days for service.
Confirm Your GE Ice Maker Isn’t Accidentally Turned Off
Flip the Physical Ice Maker Switch Immediately
Check inside your freezer compartment for the ice maker’s physical switch—often a small lever near the unit. Flip it firmly to the ON position if it’s currently off. Many homeowners accidentally bump this switch while reaching for frozen items, especially on models like the GE Profile series. If you hear a faint click when switching it on, that’s a good sign the electrical connection is intact. Models without physical switches (like French door refrigerators) use digital controls, so proceed to the next step.
Force-Reset the Bail Arm Position
The metal or plastic bail arm that stops production when the bin fills must sit fully in the down position to trigger ice making. Gently push it downward until you feel it click into place—don’t force it. Ice buildup around the arm’s pivot point or an overfilled bin can prevent proper positioning. For models with plastic arms (common in newer GE units), check for cracks that might prevent full movement. If it won’t stay down, unplug the fridge for 5 minutes to reset the system before repositioning.
Disable Digital Ice Lock Features
On touchscreen GE models, locate the “Ice Off” indicator or child lock icon on the control panel. Press and hold the lock button for 3 full seconds until the icon disappears—this often resolves phantom “off” states. Some models require holding both the Water and Lock buttons simultaneously. If your display shows “ICE OFF” even after unlocking, perform a full refrigerator reset by unplugging for 30 seconds. This clears temporary software glitches affecting ice maker operation.
Activate GE’s Built-In Diagnostic Mode
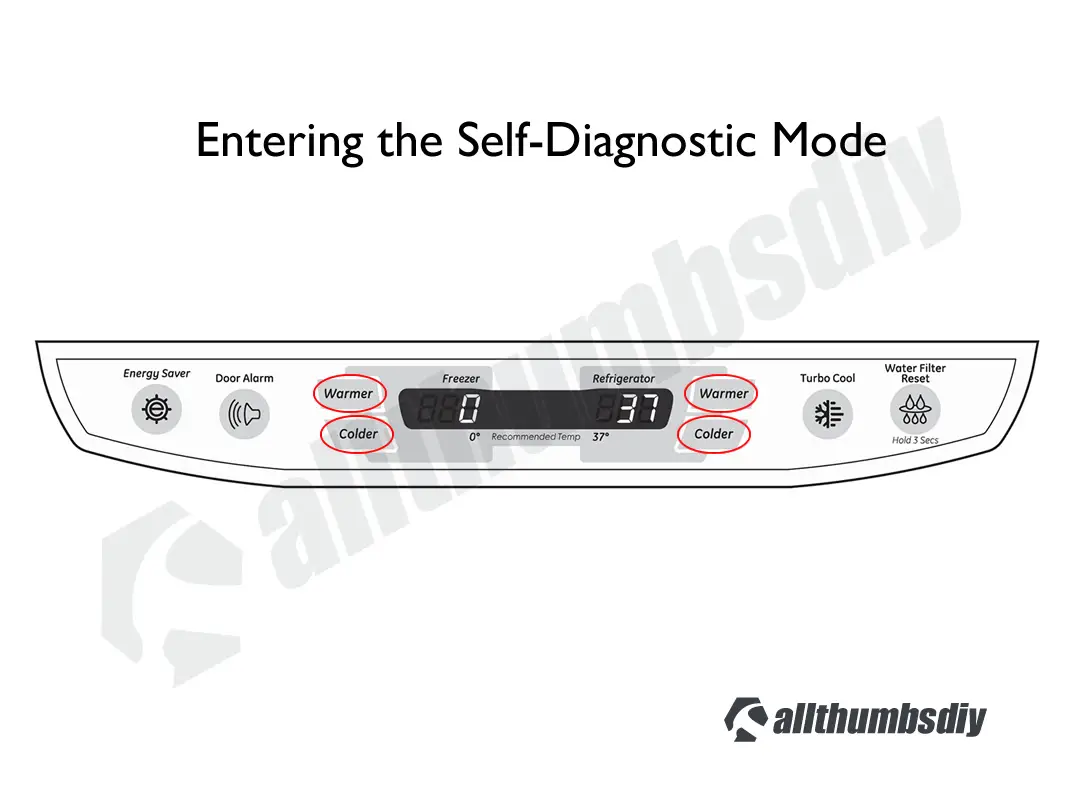
Access Error Codes Using Button Sequences
Press and hold your refrigerator’s Ice Type and Child Lock buttons together for 3 seconds. When successful, the display shows dE followed by error codes like E1 (temperature sensor failure) or E2 (motor circuit fault). Consult your model’s manual for code specifics—most GE units use this universal sequence. If no codes appear but the ice maker remains dead, the issue likely involves mechanical components rather than electronics.
Execute the GE-Specific Reset That Restarts Production
- Turn the ice maker switch OFF and wait 60 seconds
- Switch back ON while watching the unit
- Push the white paddle 3 times within 15 seconds—this simulates a full bin detection
- Wait 2 minutes for the cycle to begin (listen for motor hum and water filling)
If you hear no activity after this sequence, the ice maker module has likely failed. Models like the GFE26JSMKES require this exact reset method before diagnosing further.
Unblock Water Supply to Your GE Ice Maker

Locate and Fully Open the Water Shutoff Valve
Find the ¼-inch water line valve behind your refrigerator or under the kitchen sink. Turn it counterclockwise until it stops—partial openings cause 70% of low-water-flow issues. Check for kinks in the plastic supply line where it connects to the fridge; a gentle straightening often restores flow. If you recently moved the refrigerator, ensure the line isn’t pinched between the appliance and wall.
Test Water Pressure in 60 Seconds
Close the shutoff valve, disconnect the line from the fridge, and direct it into a bucket. Open the valve for 10 seconds—you need a steady stream filling at least 1/3 of a cup. Weak flow indicates plumbing issues requiring professional attention, as GE units need 20+ PSI minimum to function. After vacations, run the water dispenser for 2-3 gallons to purge air pockets that block the ice maker fill cycle.
Replace Your GE Water Filter Immediately
Identify and Swap Out Clogged Filters
Locate your filter—typically in the upper-right fridge compartment—and twist counterclockwise to remove. Replace every 6 months regardless of indicator lights, as clogged filters cause hollow cubes or complete failure. When installing a new filter (like the XWFE model), push firmly until it locks with a click. GE units automatically restrict ice production when filters are expired or improperly seated.
Complete Post-Installation Flush Protocol
After filter replacement, dispense 2-3 full gallons of water through the door to eliminate carbon dust and air bubbles. Reset the filter indicator by holding the dedicated button for 3 seconds—ignoring this step leaves the system in “filter change” mode, disabling ice production. Discard the first bin of ice to avoid cloudy or off-tasting cubes from residual particles.
Adjust Temperatures for Optimal Ice Production
Set Freezer to Exactly 0°F for Reliable Cycling
Use an appliance thermometer placed on the middle shelf to verify 0°F (-18°C). Most GE ice makers won’t cycle if temperatures rise above 5°F. Adjust the freezer control to the coldest setting, then wait 8 hours before rechecking—rushing this step causes misdiagnosis. If temperatures won’t stabilize, clean condenser coils with a brush and check door seals using the dollar-bill test (seals should grip the bill firmly).
Prevent Temperature Swings During Use
Keep your freezer ¾ full with containers of water or frozen items to maintain thermal stability. Each time you open the door, warm air floods the compartment—limit openings to under 30 seconds during meal prep. Replace cracked door gaskets immediately, as even small gaps prevent the freezer from reaching the critical 0°F threshold needed for ice maker activation.
Thaw Frozen Components Blocking Ice Production
Target Common Freeze-Up Points with Precision
Fill tube thawing: Use a hair dryer on LOW setting directed at the tube behind the ice maker for 5 minutes—never use sharp objects that could puncture it. Auger motor thawing: Remove the ice bin and warm the motor housing area with the dryer until rotation resumes. Ice chute clearing: Run warm (not hot) water through the dispenser chute to dissolve blockages causing slow dispensing.
Stop Recurring Freeze-Ups Permanently
After thawing, check door seal integrity by closing it on a dollar bill—if you pull it out easily, replace the gasket. Ensure your freezer maintains steady 0°F temperatures by avoiding overstocking near vents. Models like the GNE27JSMKES are prone to fill tube freezes if the door is left open during ice bin removal—always complete this task within 30 seconds.
Diagnose Critical Component Failures

Test the Ice Maker Module with a Multimeter
Unplug the refrigerator and locate the module’s wiring harness behind the unit. Set your multimeter to ohms (Ω) and test for continuity across the motor terminals—200-500 Ω indicates functionality. No reading means the module needs replacement (part numbers vary by model). While you’re there, inspect the ejector arm for ice jams or stripped gears; clear obstructions with warm water before replacing parts.
Verify Optical Ice Level Sensor Function
Find the infrared sensors on either side of the ice bin—tiny LED lenses that detect full bins. Clean both lenses with a microfiber cloth to remove frost or dust. Ensure the bin is fully seated; misalignment tricks the system into thinking it’s full. If the ice maker cycles but stops after one batch, sensor issues are the likely culprit on models like the GFE26JSMKES.
Replace Faulty Water Inlet Valves
Confirm Valve Failure with Two Simple Tests
During an ice maker fill cycle, listen for the distinct “click” of the solenoid valve activating. No click means electrical failure. For a flow test, disconnect the water line at the valve while the cycle runs—you should see steady water pressure. Weak or no flow confirms valve replacement is needed ($25-60 part). Always unplug the fridge before accessing the valve at the rear.
Complete Valve Replacement in 20 Minutes
- Shut off water supply and unplug refrigerator
- Remove the lower back panel with a ¼-inch nut driver
- Disconnect wire harnesses and water lines (place towel underneath)
- Unscrew mounting bracket and install new valve
- Reconnect components and test for leaks before restoring power
This repair resolves persistent “no water fill” issues on GE units when supply lines and pressure check out.
Know When to Call GE Professionals
Recognize Critical Failures Beyond DIY Repair
Contact GE immediately if you notice oil stains on the floor (refrigerant leaks), burnt plastic smells from control boards, or swollen capacitors on electronic components. These indicate sealed-system failures requiring EPA-certified technicians. If your unit is under warranty, call 1-800-432-2737 before attempting repairs—unauthorized fixes void coverage. Labor costs average $150-300, but professional diagnosis beats repeated part replacements.
Maintain Your GE Ice Maker for Year-Round Reliability
Implement Monthly Prevention Habits
Empty and wash the ice bin with mild soap monthly to prevent clumping and odors. Inspect the water line for kinks each time you restock groceries—a simple visual check prevents 80% of supply issues. Wipe door seals with vinegar solution to maintain airtight closure and consistent temperatures. These quick actions keep your ice maker functioning reliably between deep cleanings.
Schedule Annual Deep Maintenance
Every 6 months, replace the water filter even if the indicator hasn’t lit—you’ll avoid slow production and hollow cubes. Vacuum condenser coils using a brush attachment to maintain cooling efficiency. Sanitize the ice maker mold with a 1:10 bleach solution, running 3 rinse cycles through the dispenser afterward. Following this routine prevents 90% of GE ice maker failures before they start.
Resolving “GE ice maker not working” issues typically takes under an hour when you follow these targeted steps. Start with the bail arm reset and diagnostic mode before progressing to water supply checks—most problems hide in these simple areas. Keep your model number handy for part replacements, and remember that consistent temperature maintenance prevents future headaches. Within hours, you’ll have crisp ice flowing again without costly service calls.