How to Clean Ice Maker Chute: Quick Steps
This post contains affiliate links. As an Amazon Associate, we earn from qualifying purchases.
That first sip of your favorite drink should refresh, not repulse. Yet when black specks swirl in your glass or musty odors taint your ice, your ice maker chute is silently contaminating everything you serve. These microscopic invaders aren’t just unsightly—they’re actively compromising your health and damaging your appliance. The good news? You can completely sanitize your ice maker chute using supplies already in your pantry, restoring pure, fresh-tasting ice without expensive service calls. Follow this proven process to eliminate mold, bacteria, and buildup from every hidden corner of your ice chute in under 30 minutes.
Why Your Ice Maker Chute Develops Black Particles
Mold Growth in Hidden Areas
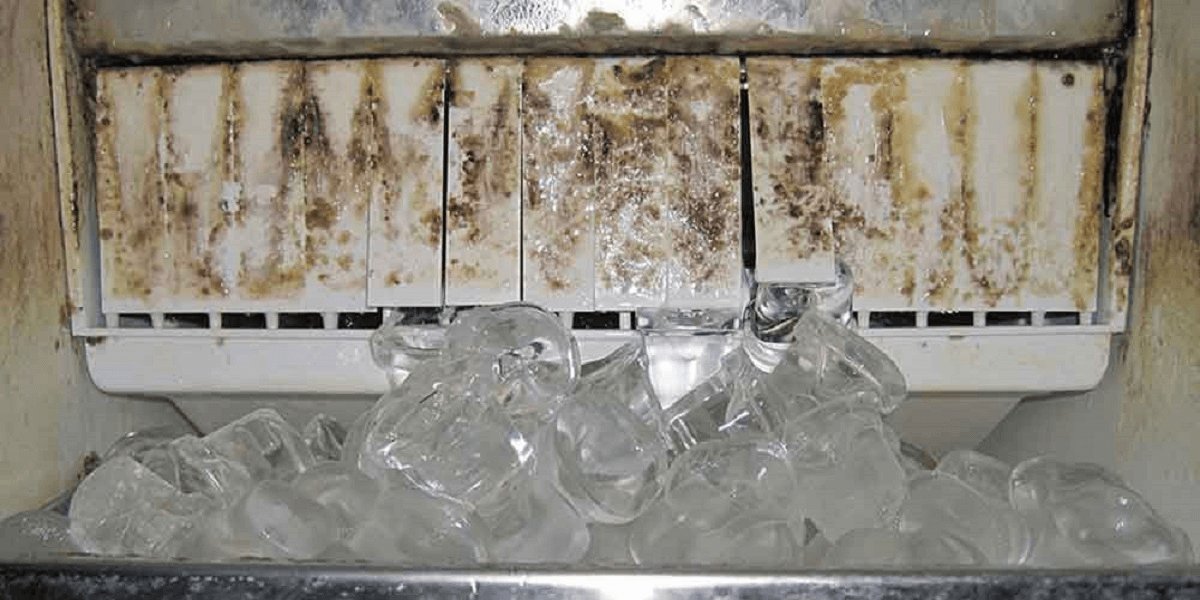
Black specks appearing in your ice cubes signal active mold colonies thriving in your chute’s dark, moist environment. These microscopic invaders take root in microscopic scratches and crevices most homeowners never see. Unlike surface mold you’d spot on bread, ice maker mold works invisibly until it sheds particles into your frozen water. Each black fleck represents thousands of mold spores multiplying with every ice cycle. Ignoring these signs allows contamination to spread deeper into your appliance’s internal mechanisms.
Bacteria Colonies Affecting Ice Quality
Musty odors clinging to your ice indicate bacteria colonies flourishing where moisture meets darkness. Your ice maker chute creates the perfect breeding ground—cool temperatures that don’t kill bacteria but slow their growth enough for them to establish permanent colonies. These microorganisms feed on microscopic food particles and minerals in your water supply, producing metabolic byproducts that transfer directly to your ice. The resulting earthy smell ruins the taste of everything from water to premium whiskey, making even filtered water taste stale.
Humidity-Induced Blockages
Reduced ice flow or clumping ice signals humidity has created excessive buildup inside your chute. As your freezer cycles, warm air enters during door openings, causing condensation that freezes onto chute surfaces. This ice buildup narrows the dispensing path, forcing your motor to work harder with each cycle. Left unaddressed, these blockages strain mechanical components, potentially leading to costly repairs. You’ll notice warning signs like grinding sounds during dispensing or ice that sticks together in unnatural clumps.
Power Down and Prepare Your Ice Maker

Proper Shutdown Procedure
Unplug your refrigerator immediately before touching any internal components—never rely solely on the dispenser’s off button. Many modern models maintain power to the ice maker circuit even when the dispenser appears inactive. Consult your manual for a dedicated “clean” mode that safely locks out electrical components during maintenance. This critical step prevents accidental activation that could damage cleaning tools or injure your fingers during the process.
Complete Ice Removal
Empty both the storage bin and chute of every ice cube, discarding all ice completely—never save “clean-looking” cubes as they likely contain contaminants. Use a plastic utensil to break up stubborn ice clumps, working from top to bottom to avoid scratching surfaces. Metal tools can create microscopic grooves where future mold colonies will anchor, so stick with plastic spatulas or spoons. Check behind the ice bin for hidden ice fragments that could melt and cause recontamination.
Gather the Right Cleaning Supplies
Essential Basic Kit
- White vinegar (natural mold killer)
- Warm water
- Unscented dish soap
- Microfiber cloths (lint-free)
- Extended cotton swabs
- Bright LED flashlight
- Plastic ice scoop
Deep Cleaning Additions
- Food-grade sanitizer
- Spray bottle
- Small bowl for soaking
- Paper towels (not regular towels that shed fibers)
Weekly Maintenance Cleaning Routine
Clearing Ice Blockages Safely
Begin by removing any ice clumps from the storage bin using a plastic utensil. Work gently from the top down, applying minimal pressure to avoid damaging chute surfaces. Never force ice through the dispenser mechanism—this can crack internal components. If ice won’t budge, allow the unit to sit unplugged for 15 minutes to thaw slightly before attempting removal again. Complete clearance ensures your cleaning solution reaches all contaminated surfaces.
Effective Soap Cleaning Method
Mix one teaspoon of unscented dish soap with two cups of warm water. Dip a microfiber cloth in the solution and wring until damp—not wet. Methodically wipe every accessible surface inside the chute, paying special attention to corners where buildup hides. Use a plastic utensil wrapped in cloth to reach deeper areas. This gentle cleaning removes surface contaminants without damaging plastic components. Avoid abrasive scrubbers that create microscopic scratches where mold will return faster.
Complete Rinse and Dry Process
Rinse thoroughly with clean water using a fresh cloth, repeating until no suds remain. Any soap residue will taint your ice and potentially cause digestive issues. Finish by patting all surfaces dry with paper towels, then leave the ice bin door open for 30 minutes to ensure complete drying. Moisture is mold’s best friend—incomplete drying guarantees rapid regrowth of contaminants. Verify dryness by touch before proceeding.
Deep Cleaning for Mold and Mildew Removal
Optimal Vinegar Solution Formula
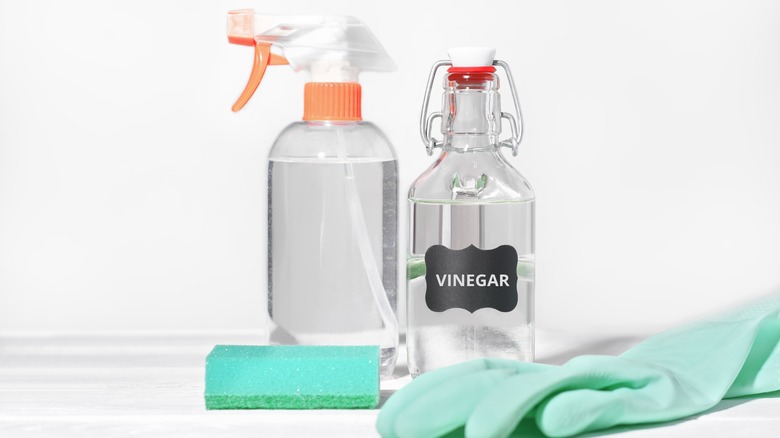
Create a 50/50 mixture of hot water and white vinegar in a spray bottle. The heat amplifies vinegar’s antimicrobial properties while the acidity dissolves mineral deposits. This food-safe solution kills 99.9% of common ice maker contaminants without harsh chemicals. Use water hot enough to enhance effectiveness but cool enough to handle safely—around 120°F works well. Shake gently before each application to maintain proper mixture.
Targeted Cleaning of Problem Areas
Remove the ice bin and soak it in your vinegar solution for 15 minutes while you clean the chute interior. Wrap a vinegar-soaked cloth around a long spoon handle to reach deep into the chute, rotating as you pull it through to cover all surfaces. Shine your flashlight to reveal hidden mold colonies appearing as dark spots or discoloration. Use extended cotton swabs dipped in vinegar for corners and crevices, replacing them frequently as they become contaminated.
Advanced Front Panel Removal
For severe contamination around the dispenser face, carefully remove the front panel by locating two small slots at the bottom edge. Gently insert a flathead screwdriver to unclip the bottom, then slide the entire panel upward to release. Proceed with extreme caution—these plastic clips break easily under pressure. Once removed, clean all visible surfaces with vinegar solution before reattaching. If clips break, most manufacturers sell replacement panels for under $20.
Final Sanitization and Quality Testing
Professional-Grade Sanitizing
After vinegar cleaning, apply food-grade sanitizer to all surfaces following product instructions. Allow it to sit for the recommended contact time (usually 5-10 minutes) to eliminate remaining microorganisms. Some sanitizers require rinsing while others air-dry safely—check your product label. This critical step ensures complete pathogen elimination, especially important for households with young children or immunocompromised individuals.
Ice Quality Verification Process
Run three full ice production cycles, discarding each batch to flush residual cleaning solution. The fourth batch should produce completely neutral-tasting ice. If you detect vinegar or chemical flavors, run additional cycles until ice tastes fresh. Test with plain water first—flavored beverages can mask subtle contamination. Properly cleaned ice should have no discernible taste or odor, preserving the pure quality of your drinks.
Preventative Maintenance Schedule
Custom Cleaning Frequency
- Coastal/humid regions: Every 2 weeks
- Standard home environments: Monthly
- Infrequent use: Every 6-8 weeks
- Post-vacation: Always clean before first use
Daily Habits for Long-Term Protection
Empty your ice bin completely every 3-4 days to prevent old ice accumulation. Keep your freezer door sealed tightly to minimize humidity intrusion—the number one cause of ice chute contamination. If you notice early clumping, break up ice immediately before blockages form. Store ice in airtight containers when not in regular use to maintain freshness between batches.
Early Warning Detection
Monitor for these critical signs requiring immediate cleaning:
– Black particles visible on ice cubes
– Musty or earthy odors from dispensed ice
– Slower-than-normal ice flow
– Unusual grinding during dispensing
– Ice with off-tastes even after recent cleaning
Acting at the first sign of trouble prevents expensive repairs and protects your family’s health. Consider using a specialized food-grade ice machine cleaner quarterly for enhanced protection against hard water deposits and stubborn contaminants.
Maintaining a clean ice maker chute isn’t just about better-tasting drinks—it’s essential food safety practice for your kitchen. By following this systematic approach, you’ll enjoy pure, fresh ice while significantly extending your appliance’s lifespan. Mark your calendar for your next cleaning session based on your usage patterns, and make this quick maintenance task part of your regular kitchen routine. Your taste buds—and your wallet—will thank you for keeping your ice maker operating at peak performance.