Ice Maker Making Grey Ice? Here’s What to Do
This post contains affiliate links. As an Amazon Associate, we earn from qualifying purchases.
You reach for ice on a hot day only to find unsettling grey or speckled cubes in your glass. This alarming discoloration isn’t just unsightly—it signals real problems with your ice maker system. Whether you’re dealing with a built-in refrigerator unit or a standalone undercounter model, grey ice indicates contamination, mechanical failure, or filtration issues that need immediate attention.
The good news is most causes of grey ice are fixable with systematic troubleshooting. From simple filter flushes to identifying failing components, this guide provides proven solutions to restore crystal-clear ice production. Understanding what’s causing your ice maker making grey ice is the first step toward fixing it permanently.
What Your Grey Ice Color Tells You
Ice discoloration isn’t random—it reveals specific problems if you know how to interpret it. Light grey ice typically indicates carbon particles from new filters, while dark grey or black specks suggest coating deterioration or mold contamination. Uniform grey coloration points to water supply issues, whereas isolated spots or residue patterns reveal specific component failures.
Critical distinction: Grey ice usually tastes normal but looks alarming. If you notice any accompanying odor or taste change, this signals immediate water supply contamination requiring urgent attention. Don’t consume ice with off-flavors—shut down your ice maker and investigate the cause before using it again.
Filter Problems Creating Grey Ice
New Filter Carbon Sediment Causes Grey Ice
When you install a fresh refrigerator filter, the compressed carbon block naturally sheds fine black particles during initial use. These microscopic particles bond with freezing water, creating grey ice cubes or visible specks throughout your ice supply.
Your immediate fix: Run 2-3 gallons of water through your dispenser after every filter change. If your refrigerator lacks a water dispenser, discard the first two complete ice batches before using ice normally. This flushing process removes excess carbon particles before they contaminate your ice supply.
Expired Filters Lead to Grey Ice Contamination
Filters lose effectiveness after six months (sooner with heavy use). As the filtration media degrades, it allows minerals and contaminants to pass through, producing greyish ice even from clean water sources. This is one of the most common reasons for an ice maker making grey ice.
Warning signs to watch for:
– Filter indicator light activation
– Reduced water flow from your dispenser
– Noticeably slower ice production
– Visible particles in your water or ice
Proper Filter Flushing Protocol Prevents Discoloration
Every filter change requires proper flushing to prevent grey ice. This process removes excess air, carbon particles, and manufacturing residues that discolor initial batches. Skipping this step guarantees you’ll deal with grey ice for days.
Flushing volumes by filter type:
– Standard refrigerator filters: 1-2 gallons
– High-capacity commercial filters: 3-4 gallons
– Always consult your specific filter instructions for exact requirements
Contamination Sources Inside Your Ice Maker
Dirty Ice Bin Buildup Creates Grey Ice
Ice bins accumulate dust, food particles, and mineral deposits over time. These contaminants bond to new ice during formation, creating grey discoloration or visible debris throughout your ice supply.
Effective cleaning process:
1. Unplug your refrigerator or turn off the ice maker
2. Remove the ice bin completely
3. Wash with warm, soapy water using a soft brush
4. Rinse thoroughly and dry completely
5. Replace and test with a fresh ice batch
Water Supply Quality Issues Cause Discoloration
Hard water minerals directly cause grey discoloration and poor freezing quality. Conversely, connecting your ice maker to softened water introduces salt and chemicals that damage internal components while creating unpleasant-tasting ice.
New plumbing effects: Recently installed PVC pipes or fittings can leach chemicals causing temporary discoloration. Always flush new plumbing thoroughly before using ice from your system.
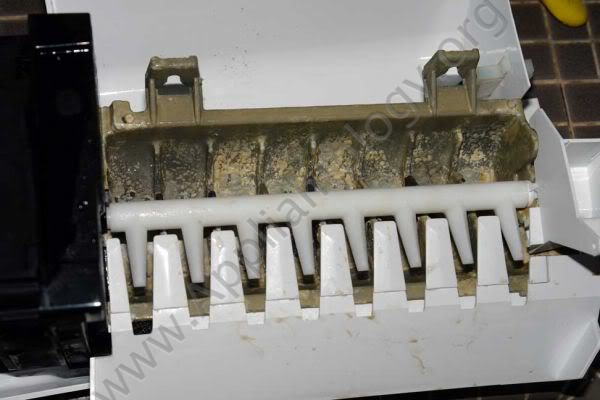
Coating Deterioration Creates Black Specks in Ice
The non-stick coating (similar to Teflon) on ice trays degrades under constant freezing conditions. This protective layer peels off as black or grey specks that embed in your ice cubes, creating the appearance of grey ice.
Important reality: This represents a systemic defect across refrigerator brands. Users report replacing ice maker units 3-4 times over 10 years due to coating failure—a recurring issue regardless of price point. If you’re on your third replacement, consider alternative solutions.
Seal and Gasket Deterioration Causes Contamination
Deteriorated foam weatherstripping or door seals create black residue that contaminates ice. Inspect these seals monthly using a flashlight to catch early deterioration before it affects your ice quality.
Replacement indicator: Frayed, tattered, or visibly degraded weatherstripping requires immediate replacement to prevent ongoing contamination of your ice supply.
Undercounter Unit Specific Grey Ice Problems
Post-Descaling Grey Ice in Commercial Units
After descaling undercounter units like Scotsman SCN60PA models, expect temporary grey to black ice. This discoloration should clear within two complete bin cycles as residual cleaning solution flushes through the system.
When to worry: Persistent grey ice after descaling indicates auger seal failure requiring professional service. Seal replacement requires specialized tools and isn’t DIY-friendly for most homeowners.
Water System Deficiencies Cause Grey Ice
Grey ice in undercounter units often signals inadequate water supply or system leaks. Black residue suggests mold or biofilm growth on internal surfaces—even with filtered water sources.
Critical insight: Using bottled water won’t fix grey ice if the machine itself is malfunctioning. Address mechanical issues before assuming water quality problems are the sole cause.
Diagnostic Protocol: Pinpoint Your Grey Ice Cause
Visual Ice Examination Technique
Check these characteristics to identify the cause:
– Uniform color: Points to water supply or filter issue
– Surface speckling: Indicates coating deterioration or carbon particles
– Internal spots: Suggests contamination during freezing process
– Residue patterns: Reveals component degradation or mold growth
Systematic Testing Checklist
Complete these steps in order to isolate the cause:
- [ ] Filter status: Check installation date and indicator light
- [ ] Water test: Dispense water directly to check clarity
- [ ] Bin inspection: Remove and examine ice tray coating
- [ ] Seal check: Inspect door seals and weatherstripping
- [ ] Supply line: Verify cold water connection only
- [ ] Initial flush: Complete filter flushing protocol
Fix Strategies for Your Specific Grey Ice Scenario
New Filter Installation Fix
- Flush system: Run 2-3 gallons through dispenser
- Discard ice: Throw away first 2 complete batches
- Monitor: Check next 3-4 batches for color normalization
- Retest: If grey persists, move to contamination checks
Expired Filter Replacement Protocol
- Replace filter: Use manufacturer-approved model only
- Complete flush: Follow specific filter flushing guidelines
- Reset indicator: Clear filter change light if equipped
- Test batch: Make and examine fresh ice after 24 hours
Dirty System Deep Clean Procedure
- Power down: Unplug refrigerator or disable ice maker
- Remove bin: Take out ice bin completely
- Wash thoroughly: Use warm, soapy water and soft brush
- Rinse completely: Remove all soap residue
- Dry completely: Prevent new ice from sticking
- Test: Make fresh batch and examine color
Coating Failure Permanent Solution
- Confirm damage: Visually inspect ice tray for peeling
- Evaluate options: Unit replacement vs. alternative solutions
- Consider alternatives: Countertop ice makers offer economical replacement
- Plan replacement: Schedule service or research new units
When Professional Service Becomes Necessary
Immediate service needed if:
– Grey ice persists after systematic troubleshooting
– Auger seal replacement required (undercounter models)
– Electrical or mechanical malfunctions present
– Warranty-covered component failures occur
Cost consideration: Repeated ice maker replacements due to coating failure often exceed the cost of switching to quality countertop units. Factor long-term reliability into your repair decisions.
Prevention Protocol: Stop Grey Ice Forever
Monthly Maintenance Tasks
- Visual inspection: Check ice color and bin cleanliness
- Quick clean: Wipe down ice bin and dispenser area
- Water test: Dispense small amount to check clarity
- Seal check: Inspect door seals for deterioration
Quarterly Deep Maintenance
- Complete bin removal: Wash thoroughly with soap and water
- Component inspection: Check coating and seal condition
- Water supply check: Verify connections and filter status
- System sanitation: Use manufacturer-approved cleaning solutions
Annual Replacements
- Filter change: Every 6 months or per indicator light
- Seal inspection: Replace weatherstripping at first signs of wear
- Water quality test: Professional testing for well water systems
- Component evaluation: Assess ice maker unit condition
Long-term Reliability Strategy for Grey Ice Prevention
The non-stick coating defect across brands creates a predictable failure cycle. Users replacing ice makers every 2-3 years should consider alternatives. Countertop ice makers offer more economical replacement cycles and easier maintenance access.
Smart approach: Track your ice maker’s failure history. If you’re on your second or third replacement, research reliable countertop models as permanent solutions. The initial investment often pays for itself within two replacement cycles.
Bottom line: Grey ice signals fixable problems—usually filters, contamination, or coating failure. Systematic diagnosis prevents unnecessary replacements while ensuring safe, clear ice production. With proper maintenance, you can eliminate grey ice permanently and enjoy crystal-clear cubes every time.