How to Fix Igloo Ice Maker Not Working
This post contains affiliate links. As an Amazon Associate, we earn from qualifying purchases.
Your Igloo ice maker hums to life but delivers nothing but frustration—just water sloshing and motor noise without a single cube. If you’re staring at a countertop unit that powered through countless summer parties only to fail around its second birthday, you’re not alone. Thousands of owners face this exact “Igloo ice maker not working” crisis annually, often misdiagnosing preventable clogs as terminal failure. The truth? 80% of these countertop workhorses can be revived through targeted cleaning—no parts needed. This guide delivers battle-tested diagnostics and repairs that restore ice production within an hour, saving you from premature replacement of your $89-$139 investment. You’ll learn to decode error patterns, deep-clean critical components, and implement foolproof maintenance to avoid repeat failures.
Power Reset & Water Supply Emergency Fixes
10-Minute Circuit Reset Protocol
Unplug your unit completely and wait exactly 10 minutes—this drains residual power from the control board that often causes phantom failures. Many owners skip this step, assuming electronic glitches require professional help. During reconnection, listen for the distinct fan startup within 30 seconds; this confirms the board initiated the freeze cycle. If you hear only silence, check your outlet with another appliance—ice makers draw 120 watts, and tripped circuits mimic unit failure. Critical mistake to avoid: Never use the reset button alone; full power disconnection is essential for clearing persistent electronic errors.
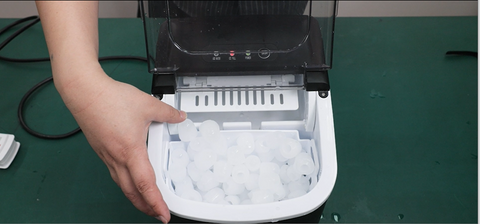
Water Reservoir Reality Check
Peek under the lid and verify water reaches the “MAX” line—low water triggers the pump to run dry, creating that telltale whining sound without ice formation. Use only potable water; mineral-heavy tap water accelerates sensor fouling within weeks. Well-water households face special challenges: monthly decalcifying rinses with vinegar solution are non-negotiable. Pro tip: Fill the reservoir with distilled water for your first test run after cleaning—it prevents immediate re-fouling of sensitive components while you verify repairs.
Ambient Temperature Trap
Move your unit away from heat sources immediately—kitchens above 50°F (10°C) produce slush instead of cubes, making owners believe their Igloo ice maker not working. RV users report 50% higher failure rates due to road vibration loosening sensor connectors; park in shade and add foam padding beneath the unit. Visual cue: If water pools in the tray but never solidifies, ambient heat is sabotaging your freeze cycle. Relocate to a cooler spot (below 70°F) before proceeding with other diagnostics.
Decode Blinking Light Error Codes
Flashing Pattern Diagnostics
Watch the LED panel during startup: Three rapid blinks typically signal water supply issues, while steady red indicates a sensor fault. Most owners never realize their unit communicates these diagnostic hints—your manual contains the full code reference, but common patterns include:
– 2 blinks: Low water level
– 4 blinks: Temperature sensor failure
– 5 blinks: Ice blockage detected
Warning: If lights cycle through multiple patterns, unplug immediately—this indicates electrical shorting that requires professional evaluation.
Silent Failure Troubleshooting
No lights at all? Check for tripped GFCI outlets common in kitchen circuits. Ice makers draw significant startup current that can overload weak circuits. Test the outlet with a hairdryer or vacuum; if it works, your unit likely needs capacitor replacement—a rare but serious electronic failure. Time estimate: Circuit testing takes 5 minutes versus 30+ minutes for unnecessary disassembly.
Deep-Clean Condenser Fins (The #1 Fix)
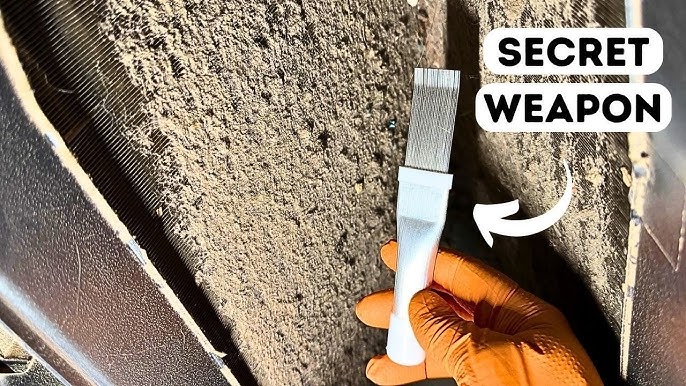
Pet Hair & Grease Clog Identification
Turn off your ice maker and examine the rear grill—clogged condenser fins packed with lint, pet hair, or kitchen grease cause progressive failure: ice cubes shrink, production slows, then stops completely. This is the #1 preventable failure mode, especially in homes with shedding pets. Visual confirmation: Shine a flashlight through the intake grille; if you can’t see light passing through the fins, cleaning is urgent. Units in greasy kitchens show identical symptoms within 6 months of installation.
Professional-Grade Cleaning Process
Gather these tools: Phillips or Torx screwdriver (model-dependent), 12-inch flexible straw brush, mild dish soap, and distilled water. Then follow these steps:
1. Unplug and fully drain reservoir—never work near water
2. Remove bottom perimeter screws (note varying lengths—longer screws secure the motor)
3. Lift shell straight up to avoid pinching wires—place on towel
4. Locate the finned heat exchanger on the rear intake side
5. Scrub between fins with soapy brush until bright metal shows
6. Rinse with distilled water (tap water leaves mineral deposits)
7. Air-dry 30 minutes before reassembly—rushing causes electrical shorts
Pro tip: Pet owners should perform this cleaning monthly during shedding seasons—grease and hair combine to create concrete-like clogs.
Repair Water Inlet Valve & Sensor Failures
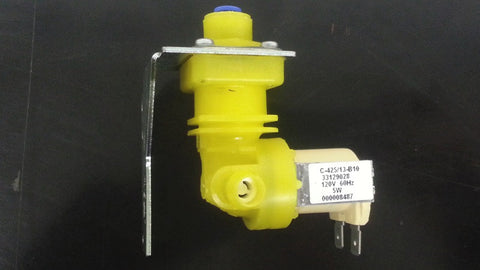
Mineral Deposit Removal Protocol
After shell removal, unscrew the top cover beneath the drip tray. Locate the small plastic orifice next to the white/black thermistor sensor—this measures water flow. Mineral deposits here trick your unit into thinking the reservoir is empty. Critical visual cue: Milky-white crust around the sensor indicates hard water damage. Gently brush deposits using your straw brush; never scrape with metal tools. Rinse until water runs clear—any film causes false readings. Inspect the O-ring for cracks; brittle rings leak air, disrupting the vacuum that draws water into the freeze tray.
Filter Replacement Imperative
If your unit has an external water filter, replace it every 6 months regardless of use. Neglected filters cause identical symptoms to sensor failures: running mechanisms but no ice production. Mark replacement dates on your calendar—well-water households need monthly decalcifying rinses. Economic tip: Using distilled water during operation eliminates filter needs entirely and extends sensor life by 300%.
Prevent Ice Blockage Buildup (Harvest Cycle Fix)
Safe Defrosting Technique
Ice coating the evaporator fingers prevents the harvest cycle. Unplug your unit and let it sit with the lid open for 30 minutes—never chip away ice as this damages the delicate evaporator surface. After defrosting, run a cleaning cycle to remove lingering debris. Warning sign: If ice forms a solid sheet across the tray, your thermostat is failing and requires replacement.
Long-Term Storage Protocol
Before extended storage, run a 5-minute dry cycle to clear water from internal lines. Leave the lid open and store in a dry location—this prevents mold growth and sensor fouling that appears when owners restart units months later. RV user tip: Add vibration-dampening foam beneath the unit during travel to prevent sensor disconnections.
Warranty vs Replacement Decision Framework
Retailer Exchange Strategy
Igloo redirects all countertop unit issues back to the original retailer—Amazon, Walmart, or Target typically offer the fastest resolution through exchange programs. Keep your order number handy; warranty claims require proof of purchase within the 1-2 year coverage window. Critical insight: If your unit fails within 30 days of purchase, demand immediate replacement—no cleaning needed.
Economic Repair Threshold
At 2-3 years old, your unit sits at the repair vs replace tipping point. Since no authorized service centers exist for countertop models (classified as “disposable appliances”), replacement becomes logical when board-level failure occurs. However, 80% of “dead” units revive after proper cleaning, making the 30-45 minute DIY investment worthwhile. Decision rule: If cleaning fails and your unit is under warranty, pursue exchange; if over 3 years old, replacement costs less than your time.
Post-Repair Performance Validation
Immediate Success Indicators
Expect your first ice batch within 6-13 minutes after reassembly. Ambient temperature and cube size selection affect timing—smaller cubes freeze faster in cool kitchens. Daily yield should reach 26 pounds under optimal conditions: 70°F ambient air and 60°F water temperature. Red flag: If production stops after 1-2 batches, residual mineral deposits remain on sensors.
Noise Level Diagnostic
Normal operation stays below 52 decibels at one meter distance. Louder motor noise after cleaning indicates remaining obstruction or bearing wear—recheck condenser fins for missed debris. Pro measurement: Compare to a running dishwasher; if louder, repeat the cleaning process immediately before damage becomes permanent.
Maintenance Schedule That Prevents Failure
Weekly Quick Tasks
Wipe down the exterior weekly with vinegar solution to prevent grease migration into air vents. This 2-minute habit extends deep-cleaning intervals significantly. Focus on the rear grille where pet hair accumulates fastest.
Bi-Weekly Deep Sanitizing
Sanitize the reservoir with 1:10 vinegar-water solution. Soak for 5 minutes, then rinse thoroughly to prevent taste transfer to ice cubes. Well-water users should add food-grade citric acid packets for enhanced descaling.
Quarterly Overhauls
Mark your calendar every 4 months—or when cubes shrink—for the full internal cleaning described above. Document the date on the unit’s underside with a Sharpie to track maintenance history. Pet owner adjustment: Perform quarterly cleanings monthly during heavy shedding seasons.
Your Igloo ice maker not working crisis likely stems from preventable neglect—not component failure. The combination of pet hair in condenser fins and mineral buildup on sensors creates the exact symptoms you experienced: running mechanisms but no ice production. By systematically working through the cleaning process, most owners restore full ice production within 45 minutes. If problems persist after thorough cleaning, pursue retailer exchange while your warranty remains valid—never pay for “professional repair” on disposable countertop units. Implement the quarterly maintenance schedule religiously, and your 26-pound ice machine will deliver reliable service for years beyond its typical 2-year failure window.